Main parameters
Overclocking
85%
Overall features
95%
Overall impressions
100%


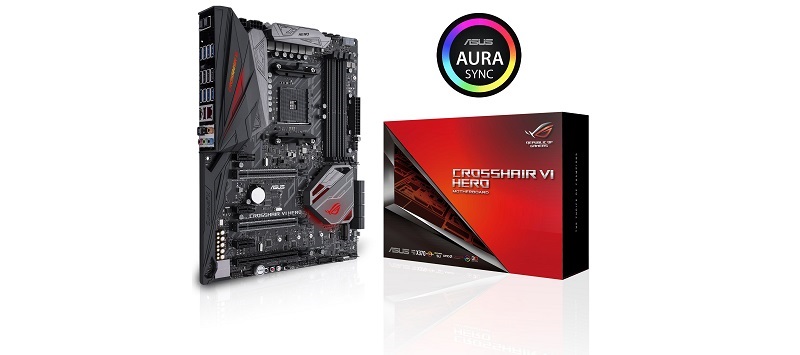
With the recent arrival of the new AMD Ryzen processors, things have really started to happen. One of the first events sees the Republic of Gamers release a new sixth generation hero. In today's review, we'll take a closer look at the Crosshair VI Hero featuring an X370 chipset. We'll find out what it can handle, what it is designed to do and who it is intended for.
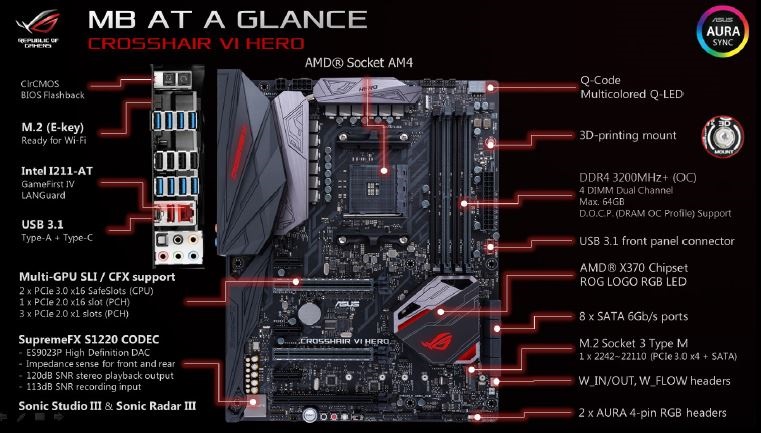 The first image shows a comprehensive overview of the C6H board. You will notice immediately that there is no sharpener. Based on the X370 chipset, the board officially supports DDR4 up to 3200MHz+ to deliver powerful overclocking compatibility. A great asset is the board's diagnostic features. There is a POST (debug) display and four colour-coded LEDs that indicate a problem when reports are turned on.
Of course there is support to simultaneously run SLI and Crossfire multi-graphic modes as well as excellent connectivity options. There is 1x M.2 slot that offers support for ultra-fast M2 SSDs in PCIe 3.0x 4 mode with a direct processor connection as well as 1x USB and 8x SATA ports. This makes it possible to fully utilise the latest NVMe protocol and reach the full potential of SSDs with the M.2 interface such as the Samsung 960 PRO and EVO. For the sake of completeness, if you want to achieve full M.2 NVMe disk speeds, you can have up to 4 SATA connectors attached. It is not a limit on the side of the board but of the chipset.
 You can see the capabilities and limitations of the X370 chipset on this official summary of the AM4 platform.
Later in this article, we will look at the significant upgrade to the Supreme FX S1220 that will seriously improve sound quality.
 ROG motherboards have recently benefited from major innovations. The first being the dedicated 3D MOUNTS that allow you to easily fit DIY 3D-printed parts to the ASUS Crosshair VI Hero. In this way Asus gives you the free choice and space to be as creative as you please. You can make labels with your own logo and nickname or give the board a full coat of armour - the possibilities are endless. You can read more about 3D MOUNT and download relevant material directly on the Republic of Gamers website.
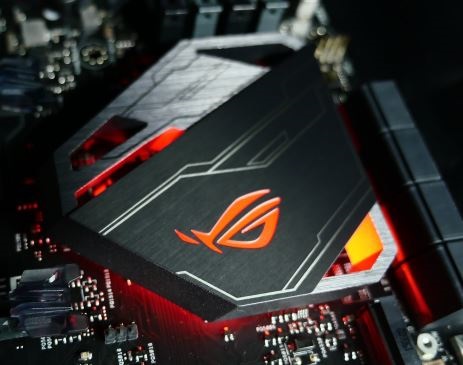
The second innovation is the AURA ecosystem, which primarily enables the motherboard and backlighting to synchronise with AURA compatible components. There is a 2x RGB_HEADER on the motherboard, which can be connected to LED strips, and in some cases, can light the entire case. You can synchronise graphics cards, memory cards, your keyboard, mouse and, in some cases even your headset.
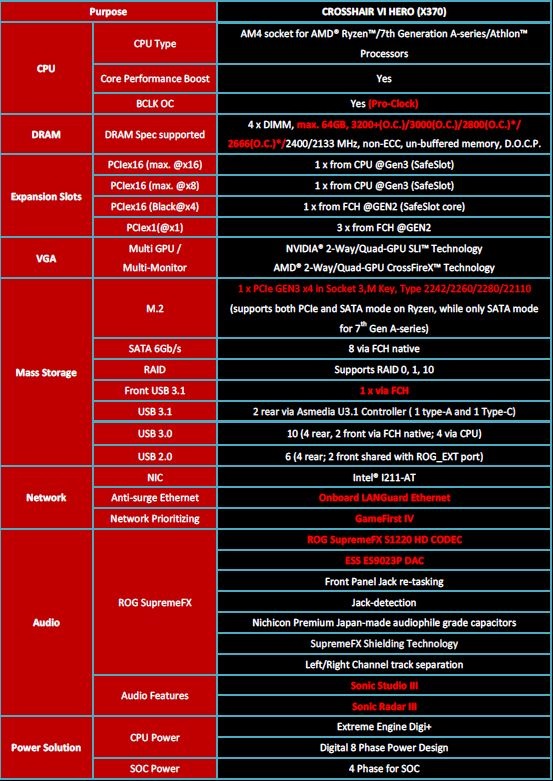
At the end of the chapter, we will look at the specifications in greater detail. Perhaps, the most interesting is the presence of an external Pro Clock generator that allows you to change the basic BCLK clock. The ASUS Crosshair VI Hero is currently just one of only three motherboards that have this option.

Like the Z270 chipset motherboards, the X370 Crosshair VI HERO also has a special water-pump connector that supports both DC and PWM modes. There are also connectors for monitoring the temperature of the fluid in the water pipes. This equipment partially replaces expensive water pump solutions such as Aquaero panels from Aquacomputer as well as many others. Again, we'll look at the software specifications later in the article.
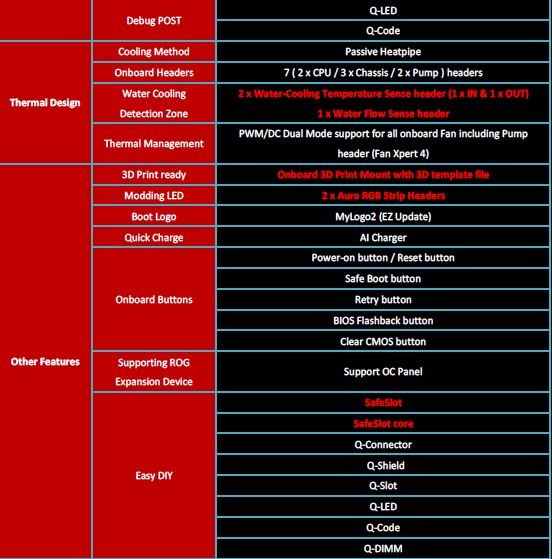
It's great to see ASUS is features support for the OC Panel software as this is an excellent tool for overclocking, especially with more extreme cooling methods such as liquid nitrogen. Now it's time to get our eyes on the motherboard and see it in all its glory...
 The motherboard is solidly-packed, well-secured and the accessories inside are well arranged.
In the package, you will find an IO shield (cover for the board's rear connectors), 4 x SATA Cables + Labels, an SLI HB Bridge, a supporting DVD, user manual, ROG Sticker and a glass ROG coaster for your favourite drink.
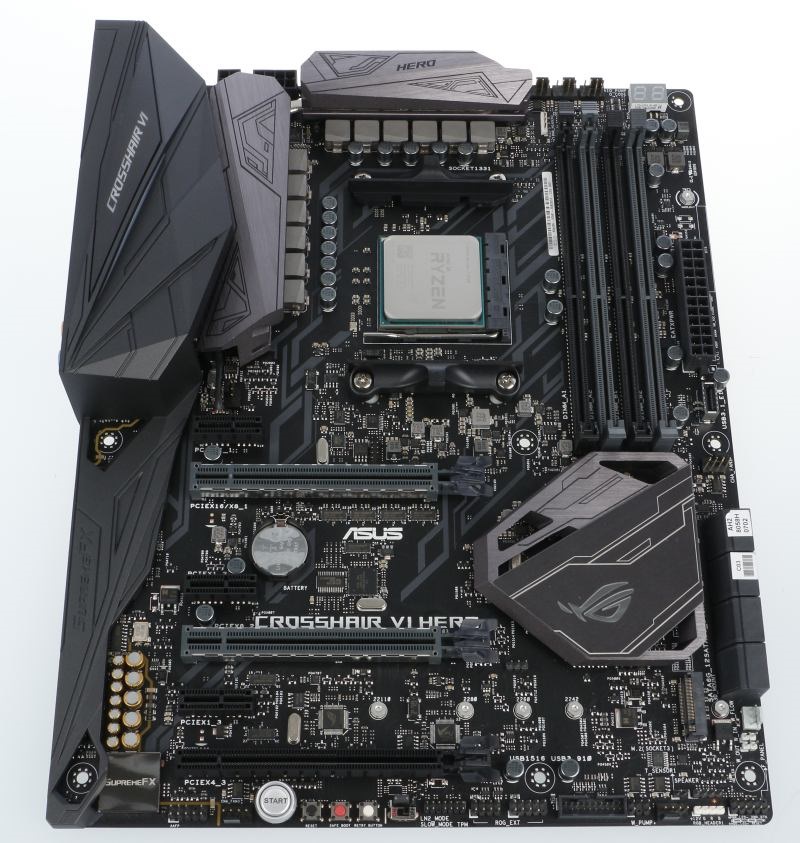 And now, here is the ASUS Crosshair VI Hero in all its beauty. You are looking at the best AMD motherboard with a design that really pleases - the Crosshair will certainly not shame all of the other components that you have picked for your AMD Ryzen rig. Of course, you can completely turn off the backlighting. Although I am not a big fan of carousel lighting, I must admit that I really like the AURA LED RGB feature on ROG boards. It is also worth mentioning the SafeSlot and that the PCI-E slots for graphics cards are reinforced. With today's graphics becoming heavier and heavier, this is a very welcome touch. And, when you add in the full sized water cooling block, the reinforced slots are definitely of use. ASUS have been successful in finding alternative places to mount cooling fans while retaining compatibility with AM3 coolers. ASUS's innovative approach shows that they really care for their customers.
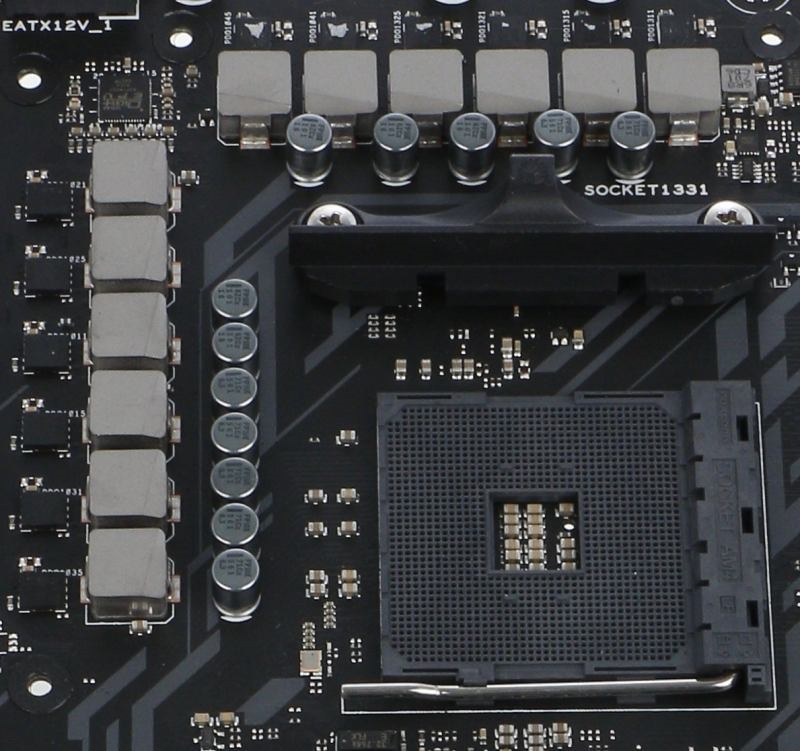 Now let's look closely at the processor power socket. This is an 8 + 4 phase composition from Texas Instruments' CSD87350 NexFet range with a single 40A performance (on paper) and an operating temperature range of -50°C to 125°C. These are the what is being called limited packages, so the lower the temperature, the greater the performance. The 8 phase socket feeds the CPU, the remaining 4 SOC (System On Chip), which includes the IMC (memory controller) + USB + M.2 + PCI-e. The theoretical minimum performance is 480A with a maximum temperature of 125°C, which is a very respectable value, and we can say that the ASUS Crosshair VI Hero is power-ready for the most extreme overclocking methods even with liquid helium. Among other things, the ASUS Crosshair VI Hero has one of the most over-sized power supply connectors on the AM4 platform. The entire power supply is managed by a Digi+ ASP1405 PWM controller.
 The power supply consists of two phases. With a 24-pin ATX, connector you can see the Probe II Sense Driver. These are measurement outputs through which the real voltage can be measured.
 This is the area with a POST (Q-CODE) display and Q-LED diodes. If something is wrong, the display will typically show a two-digit value that refers to a specific problem. For exact codes and their meaning, refer to the motherboard's user manual. A slightly easier diagnostic aid are the four LEDs, each of which has a specific colour that will tell you the location of any problem. The first diode refers to the processor, the second to the memory, the third to the graphics card and the fourth to the BOOT device (SSD/HDD disk).
 And here is the SupremeFX S1220 audio area. As the name suggests, there is an ALC1220 soundcard from Realtek with a signal/noise ratio of 120dB at the heart of it all. Unsurprisingly, Nichicon capacitors are used as they have become a mainstay of ROG boards. The total stereo sound quality is provided by the 24-bit ES9023P DAC from ESSTECH. The entire audio section of the board is treated to avoid interference from other frequency sources, which ensures that the overall clarity of the sound being supplied.
 Now we are getting to the OC part of the board with the buttons. From the left, we have a classic round start button, then a smaller black reset button, a red SAFE BOOT button which can be used to start the board using the default BIOS settings whilst retaining the previous UEFI values. Finally there is a RETRY BUTTON which is used for repeated attempts to POST even when set in UEFI. The button is used mainly for overclocking memory when it is necessary to go through memory training. Some people have said that it is possible to push the button to find out how it is set up. A flick switch is used to turn the SLOW MODE on and off. It works only in cases of extreme overclocking with liquid nitrogen, when the system has a problem and needs you to jump in. It contacts the processor and easily overcomes any problems with the so-called Cold Boot Bug, which is when the processor is so subcooled that it cannot talk to the rest of the system. Above the SLOW_MODE switch there is a jumper that can be switched on/off, the so-called LN2 mode, which allows you to raise UEFI values beyond the levels usually required for extreme overclocking under liquid nitrogen. Finally, the ROG_EXT connector provides support for the already mentioned OC Panel, however it is not part of the motherboard.
 And, in the final section we look at the back I/O part of the board. The top left button on the left is used to reset the CMOS which resets the BIOS back to its original state. The second button with the BIOS inscription is for the so-called USB BIOS FLASHBACK. With this feature, you can "flash" the BIOS when it has not been flashed correctly. This way of flashing works without the processor. All you need is a 24-pin ATX connector attached to the motherboard, a USB flash drive (preferably 4GB-8GB) formatted in the FAT32 format. Rename the required BIOS file to C6H.CAP, connect the flash drive to the bottom of the four black (USB 2.0) ports, and press the USB Flash Drive FLASHBACK for a few seconds. The light flashes and flashing is still ongoing, which takes several minutes. It's also a so-called crash-free method, so do not worry that you will destroy the board by improper flashing. I've given it a big thumbs up, and i have personally used this option many times and I regularly use it.
3x sets of 4 USB ports are also attached. The rear port offers 8x USB 3.0 and 4x USB 2.0 ports. Additionally, the Intel I211-AT Gigabit Ethernet LAN port comes with overvoltage protection and GameFirst IV technology, which, in conjunction with the application and the application of the same name, can adjust the data flow just as you like. You can optimise the internet connection, for example, to play online games. Under the LAN port, a USB 3.1 port is available, one type A connector, and the other is Type C. There is also a classic 3.5mm audio connector and an output for an optical audio cable.

This is the UEFI Extreme Tweaker section. From here, all of the primary settings that you need will be adjusted. The ASUS Crosshair VI Hero BIOS is simple and clear to use. Overclocking with the Ryzen chip is a must, and this is especially true for your memory. The minimum DRAM frequency that you should use is 2666MHz to achieve the right level of performance. In the following pictures you will see the Ryzen settings that I operate with a stable level of overclocking.
We have Overclocking Presets as the first item in Extreme Tweaker. These are pre-set overclocking profiles. You will have set the Overclock Tuner to "Advanced Setup Manual". The BCLK frequency is the base clock frequency, which is then multiplied by the so-called multiplier, see CPU Core Ratio. If we have a BCLK values of 100.00MHz and a multiplier x40, the resulting frequency on which the processor will run will be 4000MHz. As I have already mentioned, the Crosshair has a physically external BCLK generator on the board, so the BCLK can be changed here. Not surprisingly, however, in the current AM4 motherboards range, this feature is only available on the highest level Gigabyte and ASROCK boards that are so poorly available. I think this whole situation is a bad joke. So if you want to use Ryzen chips normally, just choose the ASUS Crosshair VI Hero board, as another and better option is not available yet.
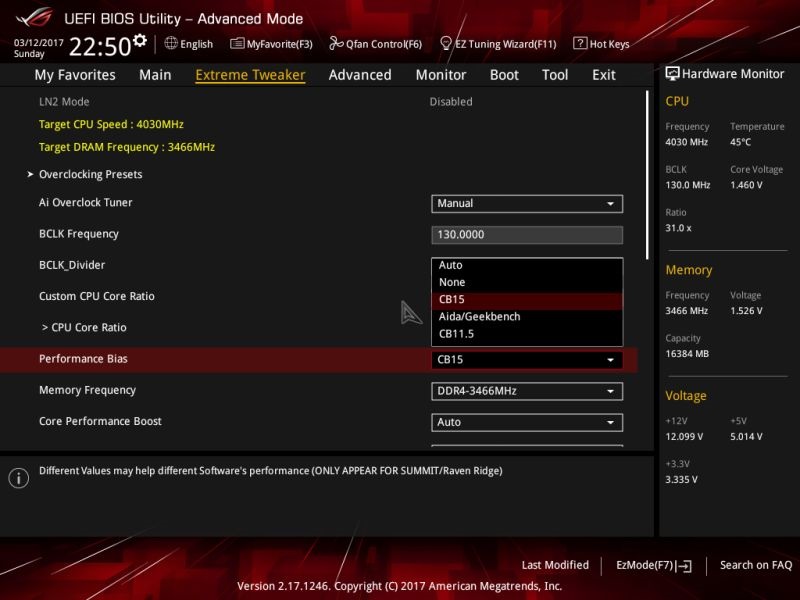 The Performance BIOS menu contains several magical options that add performance and, according to my findings, have a positive effect on the system's overall stability.
Memory frequency is a selection of the memory clock. The frequency in the menu is affected by the BCLK setting.
SMT is the setting for Simultaneous Multithreading. All platforms, including Windows 10 are not yet 100% tuned for Ryzen and games and will need SMT turned off. I recommend switching off the SMT mode when playing games. You can only re-start using the so-called cold reset, ie turning the power off and using the computer power button to reject the residual voltage.
 The above-mentioned Overclocking profiles, are for beginners, and there is nothing simpler than uploading the 4GHZ OC Profile, it works perfectly. If you turn on the LN2 mode, and several extra OC profiles will appear in the menu.
 In the second part of the Extreme Tweaker, we have some extra saving functions. The DRAM Timing Control is used to modify memory timings and the External Digi + Power Control allows you to adjust the power supply performance. It is a Tweaker's Paradise, especially for overclockers who know what they are doing and need more options to move the system to impossible levels of performance.
The CPU Core Voltage can also be set in a manual or offset mode. In the manual mode, a fixed voltage is set, the offset adds voltage in millivolts to the so-called VID value that is factory-set, and each processor core is set differently. CPU SOC Voltage is the voltage of the System on Chip package, which is a voltage set for the IMC (memory controller) + USB + M.2 + PCI-e. PLL voltage is the voltage for the internal circuits of the processor. If you do not cool with liquid nitrogen, you will not need it. The last value of the SB Voltage is as usual the voltage for the south bridge chip.
 With the afore-mentioned Timing Control DRAM menu, primary timings can be set. For now, setting them is no possible, which is common with the competing platforms. This is not caused by the motherboard, but because these options are unavailable on the processor side.
 Power supply control. You do not have to shake your head here. If ASUS excels in something, it's the setup features that you can trust unlike in the BIOS of competition boards. For the sake of completeness - Load-line Calibration, abbreviated to LLC, takes care to compensate for the voltage level to avoid significant drops or increases, which may cause instability in the first case; in the latter case, the processor does not show such changes and can negatively affect its life.
 For the sake of completeness, here is the second part of the power supply controls. The latest DRAM VBOOT Voltage can be useful when increasing memory speeds into the heavens. But for now, it is not necessary. The frequency limit is between 3600MHz-3700MHz. This is the part of the Extreme Tweaker.
 Next, we have the Advanced item in the UEFI main menu, which offers platform options. Here you can set up various controllers and devices on the system board, such as audio, Ethernet, SATA, NVMe, USB, or LED lighting controls, which can be switched off directly here.
 Another item is Monitor. This is part of the UEFI, which shows all of the values that the BIOS can read. Here we find the values of individual voltages, temperatures and fan speeds including the water pump.
 The penultimate item in the UEFI is BOOT. As the name suggests, this is a summary of the setup options that are related to the computer booting process. One of the main options here is to set the SSD/HDD priority of the operating system.
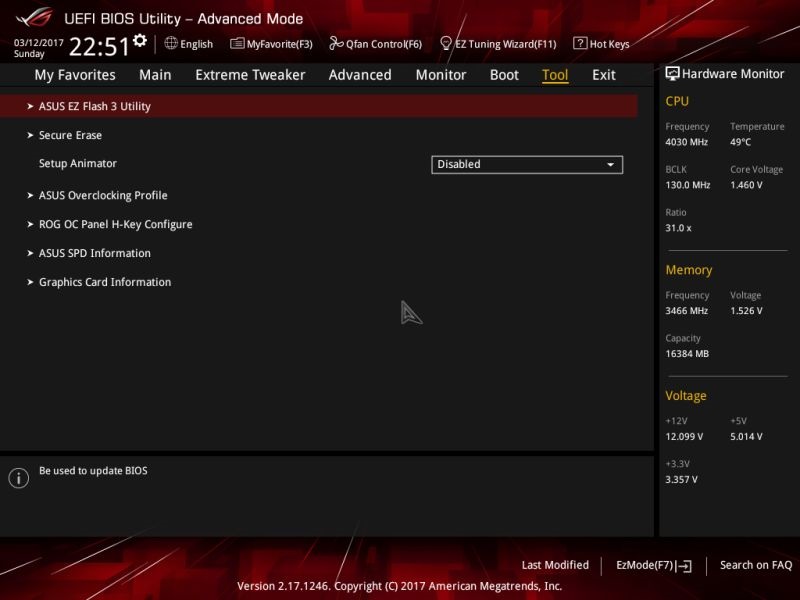 The last item is TOOL. This section offers useful and indispensable tools. ASUS EZ Flash 3 Utility is a tool to flash the BIOS of the motherboard to a newer/older version. Secure Erase is a very useful tool, and if I remembered well, it is only provided on ASUS ROG models. It is an SSD utility that can restore the device to its original state, as the classic formatting tool cannot do. With Secure Erase, you can recover the lost performance of your SSD. The ASUS Overclocking Profile is a great tool for overclocking. There are several profiles that you can name and save in the UEFI settings. I recommend using it because it makes it very easy and quick. We have the entire UEFI and BIOS capabilities behind us.

ASUS has traditionally given its ROG motherboards a package called AlSuite, which groups several handy tools together. The main part is the Dual Intelligent Processors, which is a utility that can be used to monitor system values. In addition to monitoring the processor's temperature, everything works perfectly, for this purpose I recommend using the Ryzen Master app that is provided directly from AMD.

After the TPU clicks, we can set the BCLK, multiplier, and individual voltages. In case you do not want a full graphical version of this utility, there is a less demanding and cut lite version called ASUS TurboV Core.
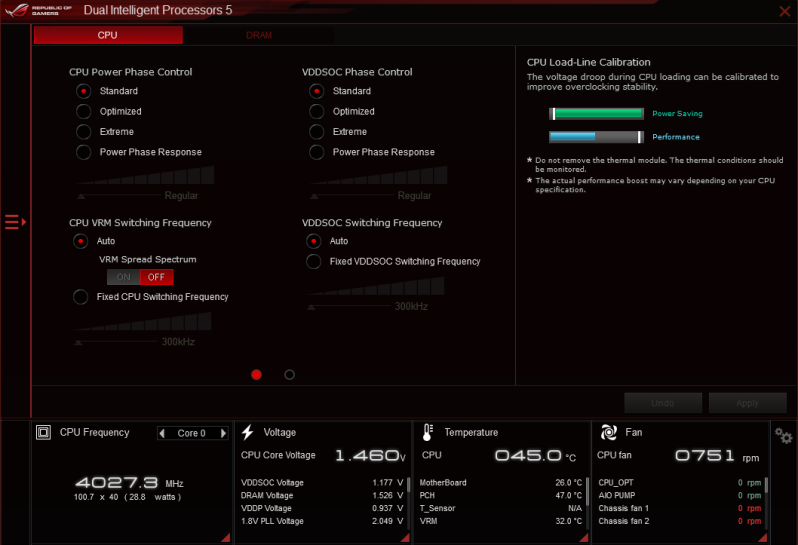 This section offers the possibility to set the power supply controls as well as in UEFI under the name of External Digi + Power Control, of course, the possibilities here are slightly limited compared to those in UEFI.
 Fan Xpert 4 is a tool for controlling the connected fans or water pumps. It is possible to set the fan power curves according to the temperature and the like.
 The latest utility is called AURA, and serves to control and synchronise RGB LED illuminations on the board and connected devices. It offers a wide range of possibilities from a wide variety of colour applications to give brightly coloured visual effects.
In the penultimate chapter we will look at tuning the Ryzen 7 1700 on the ASUS Crosshair VI Hero motherboard. Even though the AM4 platform is still in the baby stages, overclocking is possible. It's easy too, but it depends on how high you are heading. If you do anything with the Ryzen processor, it will be to adjust the memory clock speed, because the performance of the CPU with the default settings, is poor, and it is recommended to run the memory at 2677MHz at a minimum.
Test set
 For security and a review, we will provide a smaller summary of the UEFI screens. For those who do not touch them too much, it would be best to choose the Gamers' OC profiles or 4GHz.

This CPU has an overclocking limit on the kernels slightly over 4GHz. 4.1GHz is no longer possible, even at a voltage above 1.5V. I therefore chose the BCLK and CPU Core Ratio to get both 4GHz on all kernels and 3466MHz on memory, which is not a complete limit, but it's still setting within the limits that I think is possible for daytime operation. The Crosshair is currently the only motherboard for the AMD Ryzen, which gives you more memory speeds of over 3200MHz .

If you try to set the maximum levels, you'll have to manually play with the Core Voltage, CPU Core Voltage. You can leave the CPU SOC on the default, but you may need to add voltages to the memory clocks. With the latest version of the BIOS, let's keep the DRAM Voltages at 1.2V. DRAM Voltage which is the voltage for the memory modules. It will calculate how many of yours will require it and whether they can handle your desired frequency at all. For RAM speeds of 2666MHz and more, it is necessary to run the so-called single rank modules and have only two memory slots installed.
 As I have already mentioned, memory timing has a considerable impact on the performance of the entire platform, and it is necessary to find a balance between the frequency at which the memory is running and its timing. The reasonable limit of the ASUS Crosshair VI Hero with the correct memory is around 3466MHz at 14-14-14-22-67-1T. Higher frequencies at the same timing already require higher voltages that are not suitable for daily operation. Although I managed to achieve a 3600MHz overclocking with the same timing, the 3466MHz frequency was more robust and more efficient, which may probably hit the memory controller limit.
For the initial stability test, I always use the Cinebench R15. This quite a cumbersome test that eliminates any greater instability. It renders scenes with sixteen working threads that do not last long, so I repeat the test several times.
GeekBench 3 can test the system both for single threads and for multiple threads. Overall testing consists of real scenarios that the computer can meet. In addition, the stability and performance of the memory is also tested. If something is unstable, the test will usually freeze and the program stops responding.
 The SuperPI 32M Benchmark is best at detecting memory overclocking efficiency, but it's also an excellent stability test. If something on the RAM or IMC side is unstable, SuperPI reports an error. Here I am convinced that overclocking of memory at 3466MHz at 14-14-14-22-67-1T is ready for continuous operation.
The HWBOT H265 is a more demanding benchmark (test) that tests the performance of the system using video encoding. Here again I repeated the test and everything was fine. So we have the initial stability tests behind us. Of course, the best test of stability is carrying out the normal jobs you normally use on your machine. For reference, you can use more demanding applications and longer tests, such as RealBench, OCCT, Prime 95, and so on.
At the end of the chapter I will show you the overclocking the memory at speeds over 3600MHz at the same 14-14-14-22-67-1T timings. Although efficiency has evaporated, the result is clear. The ASUS Crosshair VI Hero currently has no competition on the AM4 platform, so if you want the best for your Ryzen processor, there is no better choice :)
The ASUS Crosshair VI Hero beats all current AM4 motherboards for the Ryzen chipset. Although it has its bugs new versions of its BIOS are constantly coming out, and the overall support level for the product is at the level it is supposed to be.
The Crosshair has given a great overall impression that no other board has left. As I mentioned and as you already see, there is an external basic clock generator that allows you to change the BCLK frequency, the power controls are much more detailed than needed, there are many OC functions like the RETRY_BUTTON without which you cannot get such great results, the connectivity of the boards is great. A big plus is the compatibility with AM3 coolers, which offers the C6H across the board for the AM4 platform.
Although memory-intensive settings, requires advanced levels of knowledge, the board limits are set high. High frequencies and support of good timings can be achieved with the right know how.
The only thing I would mention is that the POST time, that is, the timeframe before the board is tested from switching on, to the moment when it is possible to access the UEFI is slightly slower. I would probably have chosen the X99 platform, where the user must have some patience, and the full-time boot time of the computer is not as fast as the competitive Z270 platform that is in the flash of an eye.
Overclocking
85%
Overall features
95%
Overall impressions
100%

My name is Michal Mikle, I'm an overclocker and I enjoy testing computer performance. Where there is the possibility of squeezing the last drop of power from the hardware, I must not miss it. I love adrenaline and pushing the limits of the components and myself. For this activity I mainly use liquid nitrogen, compressor methods, but I like to play with water (sometimes undercooled) and heat or quality air cooling.

The award-winning design, ample equipment and unparalleled capabilities in the AM4 motherboard with the X370 chipset give us the ASUS CROSSHAIR VI HERO Gold Award.

